Blog Archives
Blogging from A to Z Challenge: W is for… (#AtoZChallenge)
Welcome to my April 2022 Great and Powerful Blogging from A to Z Challenge!
 Today, W is for Wagterlogue.
Waterlogue is a VERY simple app. It takes your photos and turns them into watercolours. You import an image, then select from any of 14 filters.They are: Vibrant, Natural, Bold, Luminous, “It’s Technical”, Streamlined, Travelogue, Rainy, Illustration, Soaked, Shallow, Color Bloom, Fashionable, and Blotted.
For each filter you can change the size of the brushstrokes (small, medium, large, giant) and you can adjust the brightness (dark, darker, normal, light, lighter) of your images to add more variety. And you can add a border…and that’s it!
Websites
Examples
Original image

Bold, Large brushstrokes, auto light

Rainy, Jumbo brushstrokes, Medium light

Fashionable, Small brushstrokes, darkest light

Thanks for visiting my 2022 A to Z Challenge – Letter W. You can find links to more blogs participating in this challenge at Letter W, A to Z 2022 Challenge Master List (Google Docs).
![]()
Blogging from A to Z Challenge: V is for… (#AtoZChallenge)
Welcome to my April 2022 Great and Powerful Blogging from A to Z Challenge!
 Today, V is for VSCO.
VSCO, like Snapseed, is a really robust photo editing application. Unlike Snapseed, however, it is not entirely free (you need to pay a subscription for full functionality) and it is a little harder (in my opinion) to navigate. VSCO is not, however, just an editing platform. It is also a social media platform allowing you to share images and comment on others’ images. You can also follow your favs. I have too many SM platforms, so I do not avail myself of this option.
Once you have imported a photo and opened the image editor, you have a lot of options.
First is an endless list of filter presets (Featured, Essential, Popular, Favourites, Recent, For this Photo, Warm, Cool, Vibrant, B&W, Portrait, Nature, and Urban.) You can either choose a preset filter to begin with or keep your original image and click the Edit function.
Under Edit you have Dodge&Burn, Blur, Text, Adjust (crop), Exposure, Contrast, Remove, Sharpen, Clarity, Saturation, Tone, White Balance, Skin Tone, Vignette, Grain, Fade, Split Tone, Borders, HSL. Under FX you have Essential, Distressed, Frames, Light, Texture. Finally, you can create a “recipe” from your edits.
Finally, I know there is a lot more you can do with this app, so I will need to explore further (or invite you to do so and let us know how it goes!)
Websites
Examples
Original Image

No filter, basic edits, FX Distressed (Expired 3)+Frame (8mm5)

Nature Q5 filter, some edits, FX Texture (Scratch 3)

Processed with VSCO with p8 preset
Reopened image #1 and applied a Cool filter (G5)

Processed with VSCO with g5 preset
Thanks for visiting my 2022 A to Z Challenge – Letter V. You can find links to more blogs participating in this challenge at Letter V, A to Z 2022 Challenge Master List (Google Docs).
![]()
Blogging from A to Z Challenge: U is for… (#AtoZChallenge)
Welcome to my April 2022 Great and Powerful Blogging from A to Z Challenge!
 Today, U is for Union.
Union is another app that allows you to blend photos. In this case, one photo as the background and one as the foreground (you can’t add multiple foregrounds…it’s more like a double exposure app.)
Basically the background image is static, but you can manipulate the foreground using some good masking features that allow you to blend your photos in some pretty amazing ways, which I have yet to figure out. In a nutshell:
- Load a background image, solid color, or transparent layer
- Load a foreground image, solid color, or shape
- Efficiently erase areas of the foreground image using Union’s palette of intuitive, user-friendly tools
- Adjust the position and size of the foreground image to reach desired composition
- Make color adjustments on the background and foreground so they blend seamlessly (https://www.tapsmart.com/apps/union-photo-blending-combination-editor-goes-free-app-store/)
Websites
- Union
- Union: Combine and Edit Photos
- Union app review: image-blending at its finest 2021
- Union Quick Advice
Examples
2 of the Original images


Some random fun (showing that I really don’t have a clue what I’m doing….)


Thanks for visiting my 2022 A to Z Challenge – Letter U. You can find links to more blogs participating in this challenge at Letter U, A to Z 2022 Challenge Master List (Google Docs).
![]()
Blogging from A to Z Challenge: T is for… (#AtoZChallenge)
Welcome to my April 2022 Great and Powerful Blogging from A to Z Challenge!
 Today, T is for Tintype.
Tintype is a very simple app. Coming from Hipstamatic, Tintype’s one job is to make your photos look old. There are four “colour” options: BW, two kinds of sepia (Tintype does not give them names), and colour. You can crop to square from rectangle (but you can’t decide how it crops), you can adjust the plate grain and add a frame (type decided for you), can emphasize eyes when working with portraits, and adjust the depth of field. That’s it. No sliders or anything else to do.
Here are some websites to check out
- Tintype App Brings the Magic and History of Tintype Photography to iOS
-
How To Use TinType App To Create Beautiful Vintage iPhone Photos
- TinType Review
And here are some examples:
Original image

B&W with frame

Sepia 1 in square with frame

Colour +increased grain and frame

Sepia 2 + lowered grain no frame

Sepia 2 + high grain no frame

BW with low grain and narrow depth of field and frame

Thanks for visiting my 2022 A to Z Challenge – Letter T. You can find links to more blogs participating in this challenge at Letter T, A to Z 2022 Challenge Master List (Google Docs).
![]()
Blogging from A to Z Challenge: S is for… (#AtoZChallenge)
Welcome to my April 2022 Great and Powerful Blogging from A to Z Challenge!
 Today, S is for Snapseed.
I’m gonna keep this short because most people who work in mobile phone photography know about Snapseed, and I can’t possibly do it justice in a short post. I also have “used” Snapseed for awhile, but only knew some of its features until last night when we learned WAY more about it in my iPhone Artography class. I’m looking  forward to trying more!
Snapseed has an amazing suite of editing tools, presets (that you can add to), curves, filters, brushes, healing, cropping/rotating/perspective, and masking (which is cleverly hidden, but cool cause you can walk through all your edits and delete them, revise them, or use masking to apply them to only specific parts of the photo.) And the best part of all? It’s FREE!!!
Anyway, here are some sites that can talk to you more about it.
- Snapseed online
- Snapseed at Wikipedia
- Complete Guide To Using Snapseed To Edit Your iPhone Photos
- NavEdits YouTube Channel for Snapseed – amazing tutorials!
And here are some recent creations I made, all created in Snapseed:


Thanks for visiting my 2022 A to Z Challenge – Letter S. You can find links to more blogs participating in this challenge at Letter S, A to Z 2022 Challenge Master List (Google Docs).
![]()
Blogging from A to Z Challenge: R is for… (#AtoZChallenge)
Welcome to my April 2022 Great and Powerful Blogging from A to Z Challenge!
 Today, R is for Reflect.
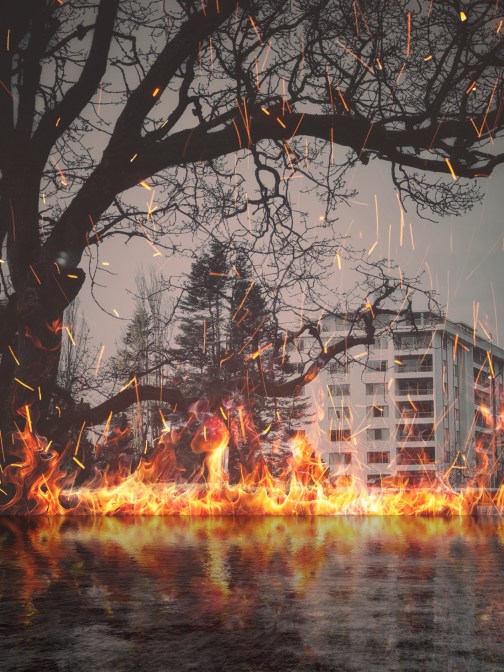
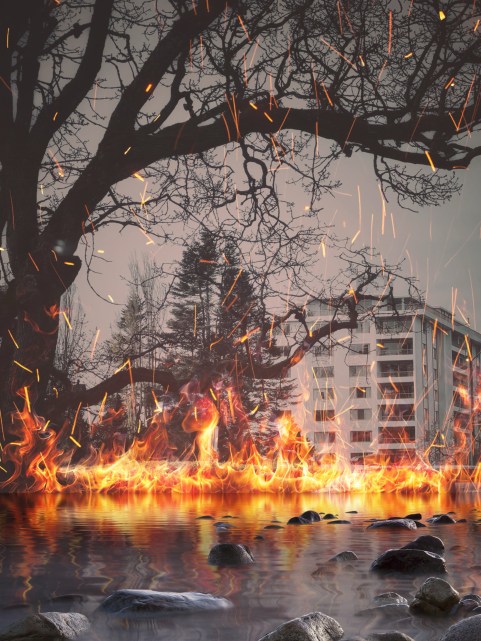
This is a simple little app, with a very similar design to Alien Skies, likely because they have the same developer. You add reflective surfaces to the lower half of an image. There are also a few enhancement options like textures and elements you can play with, and you can add a layer of fog on the top of the added surface. I have to admit, it is one of my favourite apps right now, and I have been adding water to images like crazy. Another one of those fads that will go out of style at some point, but between the menacing moon and the flood waters, I have some pretty good dystopian images right now (not sure what that is saying….)
Here are some examples:
Original Image, and the enhanced original I used in Reflect


Water Presets: Mirror Lake 3, and Mirror Lake with added lightening effect


Ocean Presets: Ocean 4 (with fog)

Ice Presets: Smooth Ice, and Fractured Ice 2


Floor Surfaces Presets: Steel, and Wood Floor 2

Sci-Fi Presets: Matrix Grid

Beaches Presets: Beach 3, and Rocky Shore 3

Tiles Surfaces Presets: Checkered

Thanks for visiting my 2022 A to Z Challenge – Letter R. You can find links to more blogs participating in this challenge at Letter R, A to Z 2022 Challenge Master List (Google Docs).
![]()
Blogging from A to Z Challenge: Q is for… (#AtoZChallenge)
Welcome to my April 2022 Great and Powerful Blogging from A to Z Challenge!
 Today, Q is for Quaint Quirky Alien Sky.
Ok, ok, ok. I am definitely cheating today, but only because the one app I could find with a Q in it, I wasn’t sure I wanted to risk doing that free three days then be charged an arm and a leg per month if I forget to stop the subscription. It looked kind of cool, but not in a way that was different from other apps I have and like. So, today is a fun one called Alien Sky.
Alien Sky adds elements to images, like planets and moons and lightening and comets. To the sky, get it? Alien sky. It also has some textures and filters and has layers so you can literally layer one element on top of another. It has some masking ability, but I haven’t played with it yet because, well, I am enamored with adding large menacing moons to all my images with skies lately.
Honestly, I found this app by looking for something that I could add a moon with. That’s it. And now I use it all the time (and probably will until I get tired of big menacing moons…)
Here are some examples, where I’ve layered elements onto the image one at a time:
Original Image

From the Planet category

From the Moon category

From the Sun/Stars category

From the Alien Worlds category

From the Nebula/Galaxies category

From the LensFlares category

All of the above with an added texture

Thanks for visiting my 2022 A to Z Challenge – Letter Q. You can find links to more blogs participating in this challenge at Letter Q, A to Z 2022 Challenge Master List (Google Docs).
![]()
Blogging from A to Z Challenge: P is for… (#AtoZChallenge)
Welcome to my April 2022 Great and Powerful Blogging from A to Z Challenge!
 Today, P is for Picsart.
Picsart is a huge (and I mean HUGES) app with features ranging from basic editing, to effects, the ability to add text or stickers, cutout options, adding photos onto photos, removing backgrounds, brush options, masking (adding dust, shadows, sparkles, etc. over top of the image), drawing options, shape masks, frames, and borders. I kind of ran out of time to do justice to this post, so I am going to give you some links to sites and show you some examples. What I use Picsart for the most is effects, cutouts, and masking effects. But the more I explore the many many options, the more I think I want to use! Picsart is also a social media platform, but I don’t think that’s a part I’ll be checking out myself…
Original Image

Effects – Artistic – Fan (very subtle)

Effects – Magic – Undead

Mask – Artistic – Art5

Nightmare Frame

Tools – Dispersion

That’s all I have time for today. This is what happens when you have a long weekend and do NOTHING on your A to Z project!
Thanks for visiting my 2022 A to Z Challenge – Letter P. You can find links to more blogs participating in this challenge at Letter P, A to Z 2022 Challenge Master List (Google Docs).
![]()
Blogging from A to Z Challenge: O is for… (#AtoZChallenge)
Welcome to my April 2022 Great and Powerful Blogging from A to Z Challenge!
 Today, O is for Oilist.
So, this is a very new app to me, having been briefly introduced to it at my iPhone/iPad Artography class the other night. But, man, it’s a cool one! I don’t claim to have figured it all out yet, but here is what it can do in a nutshell: “At its most basic, Oilist is a utility to make your photos look like oil paintings. But unlike similar art apps, this one cares as much about the process as the end result. Given a photo and a set of inputs, the app “paints” a composition right before your very eyes, stroke by stroke. It’s a living, breathing art filter.” Review: Oilist a virtual oil painter in your pocket. And it really does work that way – you can watch the painting happen, and can “snap” a still of it at any stage. In addition, there are presets and other editing features you can use to “drip” paint, or change the brushstroke angles – all things I still need to explore!
Now, I don’t necessarily advocate for making photos look like painting – perhaps you should take up painting for that. But as a piece of a greater whole art work vision, running the painted version through other apps, it adds some neat effects. In the end, you don’t necessarily know where you are going or where to end, so be quick to snap if you see something you like in the moment, because it will very quickly be gone.
There are many many styles to choose from, from Van Gogh, Escher, Manet, Monet, Kandinsky, Picasso, Hokusa, Klimt, Munch, Jennifer Bartlett, and many others. Painters like Van Gogh and Monet even have several subsets of styles to choose from. Once you choose a style, you select from a range of options from more to less abstract, then watch as the magic happens (and change presets and options as needed or wanted.) It’s hard for me to describe, you really need to try it. Here are some sites to review:
Here are some examples with snaps from start, middle, and “finish”
Original image

Van Gogh – Spirals less abstract


Hokusai Gold more abstract


Jennifer Bartlett Ovals neither less nor more abstract


Thanks for visiting my 2022 A to Z Challenge – Letter O. You can find links to more blogs participating in this challenge at Letter O, A to Z 2022 Challenge Master List (Google Docs).
![]()
Blogging from A to Z Challenge: N is for… (#AtoZChallenge)
Welcome to my April 2022 Great and Powerful Blogging from A to Z Challenge!
 Today, N is for Noir.
Noir is a pretty simple little app. It turns pictures black and white, well monochrome anyway, with very few options, but some pretty stunning results. There are 6 preset vignettes which you can fine tune by moving them around the image and pinching them in and out. There is also a set of three control dials to control contrast, outer exposure, and inner exposure. Finally you have four monochrome settings: sepia, silver, blue-gray, and chartreuse (green).
I like this app because it does little, but does it well, and you can use it before or after running photos through other apps.
And now some examples:
Original Photo

Preset Vignette 1 + sepia colour

Preset Vignette 2 (moved to right)+ silver

Preset Vignette 3 (on bottom) + blue gray

Preset Vignette 4 (at top) + chartreuse

Preset Vignette 5 (bottom right) + sepia

Preset Vignette 6 (top left) + blue gray

Thanks for visiting my 2022 A to Z Challenge – Letter N. You can find links to more blogs participating in this challenge at Letter N, A to Z 2022 Challenge Master List (Google Docs).
![]()
