Blog Archives
Blogging from A to Z Challenge: B is for… (#AtoZChallenge)
Welcome to my April 2024 Great and Powerful Blogging from A to Z Challenge!
I’ve revealed my theme (A poem a day…with picture), and of course, I am unashamedly blogging my theme letters on the fly. So, here goes nothing!
 So, without further ado, B is for … Blank Verse. Blank verse is poetry that does not rhyme but DOES have a rhythm. Not to be confused with free verse which has neither. But the rhythm can be many things including iambic pentameter which is what I am trying here.
I sit contented writing poetry
while verses wander in and out like thoughts
created from a mass of swirling clouds.
The words spill out and onto pages where
They rest, and lock in place. And I am done.
Thanks for visiting my 2024 A to Z Challenge – Letter B.
Guess I’m kind of going rogue too…although I do like using the “official” letters…

Blogging from A to Z Challenge: A is for… (#AtoZChallenge)
Welcome to my April 2024 Great and Powerful Blogging from A to Z Challenge!
I’ve revealed my theme (A poem a day…with picture), and of course, I am unashamedly blogging my theme letters on the fly. So, here goes nothing!
 So, without further ado, A is for ... Acrostic– A poem where the first letter of every line spells a subject word the content refers to.
Without a doubt, this is a silly one to start the month, but I’m ok with that!
Every day
Lying content by the fire.
Leaping to rest on the couch. Finally
Indulgent of curling
On laps,
Till he’s done.

Thanks for visiting my 2024 A to Z Challenge – Letter A.
Guess I’m kind of going rogue too…although I do like using the “official” letters…
Blogging from A to Z Challenge: 2024 Theme Reveal!
Welcome to the Great and Powerful Blogging from A to Z 2023 Theme Reveal!
This is the 13th or 14th year of the challenge, I can’t rightly remember which, and I’ve been a participant since 2014. Like last year, and every other year, I will be writing my posts on the fly!
Before I reveal my 2024 theme, here are themes from challenges past:
- 2014: I blogged about our house, and the befores and afters of the renos we did and changes we made after buying it.
- 2015: I blogged about interesting places in Victoria (all close to home).
- 2016: I blogged about learning to use my DSLR
- 2017: I blogged about my ‘hood in Welcome to James Bay!
- 2018: I blogged about the wonderful world of wabi-sabi in photographs.
- 2019: I blogged about A picture-story a day (in the life, so to speak)
- 2020: I blogged about female photographers
- 2021 I blogged Photos and Stories
- 2022 I blogged Photo editing apps!
- 2023 I blogged My life in first drafts!
This year, it’s the exciting theme of: A poem a day (with a picture)! And coincidentally, April is Poetry Month too!
So, I will see you on later today for my first post! Thanks to This That and the Other for the Going Rogue badge!
This post approved by Elliot.


Blogging from A to Z Challenge: N is for… (#AtoZChallenge)
Welcome to my April 2023 Great and Powerful Blogging from A to Z Challenge!
I’ve revealed my theme (My life in first drafts), but this year, instead of pretending there were ever plans, I am unashamedly blogging my theme letters on the fly. So, here goes nothing!
 So, without further ado, N is for National Youth Orchestra
As I mentioned in B is for Bass, I played in the NYO for three summers in a row. But my recollections are fragmented and each summers blends into the next and back again.
I remember it vaguely, fragments of scenes and feelings and scents. Muggy hot summer in Kingston, sitting on busses going on tour. I was so young. It had only been a year and a half since I started playing bass and switched my major in university from pre vet med to music. What do I remember? A trunk for my bass that was ridiculously big and heavy, and bright scarlet red. My suitcase was was also heavy and red. It was going to be a long summer that first summer – eight weeks I would be away because of the tour.
Iwish I remembered more details, but as I write this things are flashing back to me. Here are some things I wonder about and remember:
There were two of us women in the bass section that first year, but I really don’t remember much about Janice. She was much younger than I was. Audrey was the lone female percussionist and became my friend, and I ended up hanging out a lot with her and the other drummers.
We played concerts in the Queen’s University hall before embarking on any tours, but we didn’t just play. We also sang madrigals as encores which I loved, since I was also a singer.
The bass players had rooms assigned to them in the same building as the concert hall so we had room to practice (dorm rooms were pretty cramped) and also didn’t have to constantly haul our instruments over for rehearsals.
It was hot in Kingston – a damp heat which was miserable for someone from Saskatchewan. I was sometimes lonely, but I think it was an important time.
What did I use for money? The days before Interact, and certainly before I had a credit care (or did i?)
Phone booths – no cell phones back then. How much easier would things have been if I could have texted people back home.
The pub on campus – pretty vague memories and I don’t think I hung out there until my second summer.
Dorm rooms. A single bed, a desk, probably a dresser and closet. My room was right next to the bathroom with toilet and showers and even tubs.
Practice rooms. I think they might have been classrooms – they were big and had high ceilings in an old building where the concert hall was.
The cafeteria, where we ate all our meals. The low point was the day the vegetable was boiled celery. But in the cafeteria in New Brunswick I encountered fiddleheads for the first time.
Writing long letters to my best friend at the time and getting long letters back, and calling her sometimes in those aforementioned phone booths, but I don’t think as often as I though, and how did I pay for that anyway?
No computers or iPads to pass the days away, but I must have had books with me because I always had books. What did I do when I wasn’t practicing?
I must have had a camera of some kind cause I have some pictures from that time that I obviously took myself – the old film kind.
Bass in Lace. In my third year in NYO we had four women (me, Jessica, Marjolaine, Janice) playing in the bass section and we formed a quartet playing some fun tunes, including Johnny B. Goode.
Dad wrote me and Audrey a bass percussion piece that we performed at NYO in my second year there.
During one performance, with appropriately thunderous music during an actually thunderstorm, we were swooped by bats in the hall.
There was a main room in the residence building where we hung out on couches sometimes and was there a TV? I remember we watched movies there sometimes…
Once I had a day off and walked a very long way to a local mall by myself. I discovered that the concept of blocks in Kingston was very different from Regina. Numbers didn’t change by short blocks (meaning in Regina, one block was 100s, the next 200s, etc.). In Kingston every building had the next number up…the mall was much further away than I was expecting.
What did I wear? I have no recollection.
During that first year’s tour, the women stayed in a Convent in Quebec during one stop-over.
One of the bass players had a scroll on the top of his bass that had a lion’s head on it.
Ah the things I remember. I can see this topic could take a long time to break apart. More fodder for memoir!
Thanks for visiting my 2023 A to Z Challenge – Letter N. You can find links to more blogs participating in this challenge at Letter A, A to Z 2023 Challenge Master List (Google Docs).
Guess I’m kind of a rebel too…although I do like using the “official” letters…

Blogging from A to Z Challenge: M is for… (#AtoZChallenge)
Welcome to my April 2023 Great and Powerful Blogging from A to Z Challenge!
I’ve revealed my theme (My life in first drafts), but this year, instead of pretending there were ever plans, I am unashamedly blogging my theme letters on the fly. So, here goes nothing!
 So, without further ado, M is for Master of Music.
See series on My Life as a Quitter (which I haven’t really started yet…)
After I finished my Bachelor’s of Music degree on bass (see B is for Bass), I moved to Ottawa to study with a bass player there, and a year after I moved there the University of Ottawa started a Master of Music program concentrating on chamber music. Or something like that. It was a special program from my recollection. Anyway, I got into the program and embarked on a Master’s degree journey.
I remember there was a small space where the 5 of us, I think there were 5, had a little office with library carrels to do homework and the like – the days before computers. There was also a board room space next door to the office with a CD player where we had classes and also were able to sneak in and listen to music and do work with light (that room had windows, the office did not).
I should mention that all this took place in a brand new building for the Music Department. I went back to Ottawa in 2017 (Kevin had a conference) and visited the building which was hard because I remembered it brand new, and when I saw it it was 26 years later. A weird feeling.
As I said, I think there were 5 of us in the program. Me (bass), a singer, a pianist, a cellist (or maybe it was her husband who was the grad student – can’t remember what he played), and a flute plater. I only remember a couple of names, Sean (the pianist) and Sarah (the flute player). I think the singer was Marie.
While I worked on my Masters, I worked in the Music Library. Because the University of Ottawa is a bilingual university, I had to learn French in order to take classes and work there. My French was pretty rudimentary, but I could get by. I think I must have been nice to people because the one professor who everyone knew as a hard-ass French speaker always took the time to speak to me in English, maybe he appreciated that I was trying.
I made friends with one of the regular Music Library librarians, and also with one of the office staff. We hung out a bit and went to parties and the blues club down the street a ways. It was in a basement and pretty sketchy, but the music was amazing.
I played in several orchestras while I was there. The school orchestra, the Ottawa Symphony, in he Nepean symphony, and even once in the National Arts Centre Orchestra. I lived in a sketchy area of town in a one bedroom apartment on the top floor of a building where only a few months before new management took over there were knife fights in the hallway.. Never had any trouble, but I was young and walked home through the dark streets alone many more times than I probably should have.
In my last year there (not the last year of the Masters as you will see) I moved into a residence on campus. It was a four bedroom unit so I had roommates, one of whom was the flute player in my program (with whom I did not really get along…don’t remember why not). It was SO much handier living on campus. When I went back to Ottawa I walked around campus and found that building (which was also new when I lived there) – the university is in the middle of some pretty sketchy areas with a lot of homeless shelters and the like, and security everywhere now. Times change I guess.
I don”t know what precipitated my leaving Ottawa and the program. I confess it was a bit of a breakdown. I was very unhappy and didn’t feel like I was able to keep going so I dropped out and moved back home. I don’t think people were thrilled with my decision, but they threw me a party (some friends of mine) to say goodbye (a party at which I got pretty wasted and made a bit of an ass of myself…ah to be young again and not caring about how much of a jerk you are). It was a surprise party, and I was touched though. I got to see the person who organized the party when I was back in Ottawa, another flute player who I lost touch with over the years. She and her husband moved to Costa Rica (retiring) a year or two after I saw her.
Well, I’ve gone on enough about this. I am sensing a lot of memories coming to the surface and considering writing more about these tales of Ottawa Masters in the future, maybe more a autofiction than true memoir cause I will definitely be making some stuff up from memories…funny how you remember things a certain way and feel like those memories are true, but your brain also tells you that they aren’t – perhaps it’s just the way we like to fill in the gaps or avoid what we prefer not to remember.
It was a good time in some ways though, and I learned a lot about myself, I don’t know that I would be where I am now without those experiences, as painful as some of them are to recall. All part and parcel of life!
Thanks for visiting my 2023 A to Z Challenge – Letter M. You can find links to more blogs participating in this challenge at Letter A, A to Z 2023 Challenge Master List (Google Docs).
Guess I’m kind of a rebel too…although I do like using the “official” letters…
Blogging from A to Z Challenge: L is for… (#AtoZChallenge)
Welcome to my April 2023 Great and Powerful Blogging from A to Z Challenge!
I’ve revealed my theme (My life in first drafts), but this year, instead of pretending there were ever plans, I am unashamedly blogging my theme letters on the fly. So, here goes nothing!
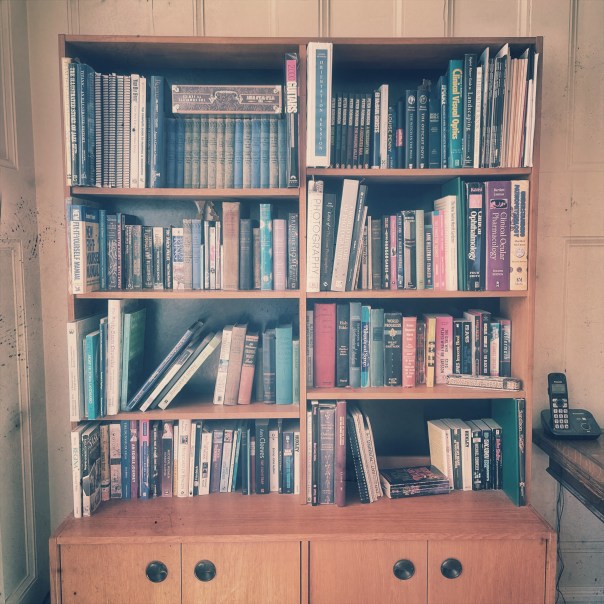
 So, without further ado, L is for Libraries (and by extension, books).
I love reading. I read all the time, to the point where sometimes Kevin is amazed, confused, and sometimes a bit jealous I think as to how I can just sit and read for hours – of course I should sometimes be doing other things, like house work and gardening and exercising and writing. But, once I get into a good book there is no stopping me.
When I was a kid I mowed through library books. Of course I had a great collection of my own, but spend every Saturday, I think, perusing the shelves of the library, stacking book after book into a pile, and hoping the librarian would let me take them all out (they didn’t always…). I think they worried I would never get through them all before the due date, but I always did.
What do I like to read? Almost anything. I have gone through Fantasy, Science Fiction, Mystery, Historical fiction, Non-fiction of all kinds, Futuristic and Dystopian fiction, Memoir (which is a current phase), and everything in between. Not traditional romance or western I guess, but there is still time…
As a kid I loved Narnia and Tolkien, and Little House books, and books about these kid detectives, Nancy Drew, then as I got older I read all of mom’s Mystery collections. But don’t ask me what my favourite book is. I can never understand how someone chooses!! Maybe A favourite in EACH genre, but even that pushes it, and changes on a daily basis. I just love to read.
And I love libraries. I don’t hang out in them as much as I used to as a kid and as a student. My office is in a library, but I don’t really spend time in the stacks or anything any more. And I know some people love the physical books, but I am addicted to my Kindle. Whatever I want to read, whenever I want to read it, and easily read in the dark.
Here are some of my (well, our I guess) book cases. Not as many books as I used to have (I give more away every couple of months or so), but some I just can’t seem to get rid of, like old friends.
This bookcase came from my room as a kid.

This bookcase came from my mom and dad’s living room.
And this one is one of two units Kevin and I absconded with (with permission) from an apartment we lived in when we first met.

Thanks for visiting my 2023 A to Z Challenge – Letter L. You can find links to more blogs participating in this challenge at Letter A, A to Z 2023 Challenge Master List (Google Docs).
Guess I’m kind of a rebel too…although I do like using the “official” letters…
Blogging from A to Z Challenge: K is for… (#AtoZChallenge)
Welcome to my April 2023 Great and Powerful Blogging from A to Z Challenge!
I’ve revealed my theme (My life in first drafts), but this year, instead of pretending there were ever plans, I am unashamedly blogging my theme letters on the fly. So, here goes nothing!
 So, without further ado, K is for Kevin.
Kevin is my guy. What can I say? He doesn’t like me to talk about him, or share pictures of him, but I am going to do both here, briefly anyway.
We met in 1994. He was the sound engineer for a traveling revue show that I was playing bass in. Saskatchewan Express was the name of said revue show – every summer they did a tour and every December they did a two-week show (not really a Christmas show, although they did do Christmas music once or twice). I played that winter show for several years, but only did the road show once – and that is how I met Kevin.
We were on a dinner break, between a dress rehearsal and a show at a hotel in Regina. I had had to run out for something and when I came back I was alone in the room where dinner was laid out, so I sat to eat something when in walked Kevin. He sat with me and we talked. That was all. But as the tour progressed we began to hang out more and gradually became a couple, much to the delight of the woman who was in charge of the show – she took full credit for our meeting!
Kevin worked as an excellent sound engineer and production guy (I don’t know what’s his official title was, but he organized and ran music shows in bars, at exhibitions, on tours, etc.) from long before I met him until just over 20 years ago when he decided to go back to school and become an optometrist. And he succeeded in spades becoming Dr. Kevin, I think in 2016. Time means nothing to me any more…everything either seems like yesterday or a million years ago. When he graduated he found a job in Victoria and we moved out here – and we have now been here for 17 years. And he even eventually started his own clinic!
We both love cats (as you may have guessed) and BBQ and hanging out at home. We are not big travel people, preferring to relax in a beautiful city with great weather, and our kitties. And friends. And family.
This is Kevin, on the right, walking with his sister who also now lived in BC, albeit on the mainland. She was in town for Easter and I took the opportunity for a nice candid and yet non invasive shot.

Thanks for visiting my 2023 A to Z Challenge – Letter K. You can find links to more blogs participating in this challenge at Letter A, A to Z 2023 Challenge Master List (Google Docs).
Guess I’m kind of a rebel too…although I do like using the “official” letters…
Blogging from A to Z Challenge: J is for… (#AtoZChallenge)
Welcome to my April 2023 Great and Powerful Blogging from A to Z Challenge!
I’ve revealed my theme (My life in first drafts), but this year, instead of pretending there were ever plans, I am unashamedly blogging my theme letters on the fly. So, here goes nothing!
 So, without further ado, J is for Jan van Eyck.
Jan van Eyck was my Masters advisor. He was the one responsible for the topic I chose to explore and research and write about, and the one responsible for keeping me engaged and picky and excited about the work I was doing. He also inspired me to begin teaching linguistics once I completed my degree – we talked teaching and linguistics and had regular coffee conversations for many years.
Jan is Dutch and moved to Canada to study Indigenous languages in British Columbia, coming here with his wife, Sonja, and their two sons, and living in communities, working with speakers, and developing close relationships. At some point after he finished his studies and PhD, he moved to Regina, Sask and began teaching Linguistics courses at what was then the Sask Indian Federated College, which eventually became First Nations University of Canada.
Jan was and is a quirky guy. He has Asperger’s syndrome, and is quite open about it. As a result he does not have a lot of social skills – those were handled by Sonja. She was so warm and invited students and faculty and neighbours and newcomers to Canada over frequently for meals and looked after everyone. At least that’s what I remember. Jan never drove, Sonja had to drive. Jan never trusted himself behind the wheel of a car and basically ran to and from work every day (they lived fairly close but it would still have explained how he kept in such good shape.).
I thought, and still think, of Jan as a mentor. His work ethic and ability to work with people of all kinds (although he had many opinions) and just to not engage in bullshit activities that often abound at universities, I have tried to emulate to an extent. He supported me to get into a PhD program and when I dropped out (part of my life as a quitter series) it took me a few years to feel brave enough to tell him. He understood much better than I thought he would and we remained friends, although I lost touch with him eventually.
Back in 2017, however, I went back to Regina to spend time with a friend celebrating her 50th and I toddled up to First Nations U to see if I could find Jan. To my surprise, as I was wandering the halls (his door was locked and no one was answering my knocks) I turned a corner, and there he was! He was shocked to see me but as we both recovered, we sat in his office for a bit then wandered off for a coffee for old times sake.
I was fortunate to find him as he was just getting ready to retire permanently. In another month, he would not have been there. His Asperger’s seemed worse, but part of that was likely due to the sad news that his wife, Sonja, had died. She had suffered for years with severe depression and after a few suicide attempts and various meds, her body was too worn out. His bedrock was gone. He was no longer teaching. His sons had moved elsewhere. So, his plan was eventually to move closer to one of his sons, but as of now I don’t know where he went. Jan was never on social media, nor does he probably have a personal email.
I am sad that I have once again lost touch with him, but the years I spent learning from him, studying with him, being mentored, getting support for teaching – well, I will never forget everything he did for me, and I hope wherever he is, he is living well and content, enjoying some quiet retirement.
Thanks for visiting my 2023 A to Z Challenge – Letter J. You can find links to more blogs participating in this challenge at Letter A, A to Z 2023 Challenge Master List (Google Docs).
Guess I’m kind of a rebel too…although I do like using the “official” letters…
Blogging from A to Z Challenge: I is for… (#AtoZChallenge)
Welcome to my April 2023 Great and Powerful Blogging from A to Z Challenge!
I’ve revealed my theme (My life in first drafts), but this year, instead of pretending there were ever plans, I am unashamedly blogging my theme letters on the fly. So, here goes nothing!
 So, without further ado, I is for Instructional Designer.
It’s what I do for work. I was going to say what I am, but it is definitely not what I am, just what I have been doing for work for the past almost 30 years. Sometimes officially called an instructional designer, sometimes just called that as describing the work I do while holding another institutional title that doesn’t mean a lot.
What is an instructional designer, or ID as we call it? Well, we help faculty design their instruction. Many faculty at post-secondary institutions are well versed in their subject area and not so well versed in how to teach it or how to assess it. That’s where we come in. In my case, the kind of work I do is with faculty using technology to support their teaching, right up to faculty teaching completely online. And I am not just talking about emergency remote teaching, which is what happened in March of 2020, but actual well planned purposeful online teaching which has been going on since the 1990s.
I became an ID in 1998 after working as a language lab tech for 7 years developing and designing language lab computer lessons. The Internet was fairly new and the Internet browser had become a thing and there was this online course platform called WebCT which was developed out of the University of British Columbia that my institution adopted. Now, when I applied for and got the job of ID in the distance learning unit at my institution, I did not just work with online courses, but also with televised courses as the main kind of distance learning going on was televised – an instructor would teach in Regina to a small group of students and be broadcast live to groups of students at colleges across the province (Saskatchewan). We ran classes this way for years – probably still do (it’s been awhile since I worked there). But as time went on I worked more and more with online classes, mostly asynchronous, but as technology advanced, also with synchronous (or like live web conferencing).
I worked there until 2007 when Kevin became an optometrist and we moved to BC. In Victoria, I found a job at the University of Victoria (never underestimate sending emails to everyone asking if they need an ID contractor…). I worked there for five years, a couple as a contractor and then as an actual employee. When the wind started to shift (political assholery by the institution), a colleague and I jumped ship to our current institution where we have been since 2013.
One of the nice things about my current position is that we are considered faculty. This means many more perks (pay, professional development, vacation), but also more respect from teaching faculty because, yes you know it, being “faculty” puts you on equal footing in many of their eyes and not just a support person who can be stomped on. I won’t digress down that rabbit hole. Suffice it to say, I do like this new status in work life.
I still work with faculty to use tech to support their teaching and to teach online. But my current passion is Open Education, which I am hoping to devote more time to. After 30 years of supporting teaching with technology I am a bit sick of it. Tech is always changing and faculty do not like change. It often feels like an uphill battle every day, and if I hear one more time how online learning is not as good as in person learning I will do something drastic. It’s NOT the mode that’s the problem, it’s the way faculty teach. Period. I have, and I know you have, experienced in person learning that left you sleeping at your desk or skipping classes or just wondering what the point was. In person does not make better learning. And that is enough of that.
So there you have it. Instructional designer is my job (even though my Masters is in Linguistics), and likely will be until I retire. It pays the bills and is sometimes kind of interesting, and you do get to work with some great people.
Thanks for visiting my 2023 A to Z Challenge – Letter I. You can find links to more blogs participating in this challenge at Letter A, A to Z 2023 Challenge Master List (Google Docs).
Guess I’m kind of a rebel too…although I do like using the “official” letters…
Blogging from A to Z Challenge: H is for… (#AtoZChallenge)
Welcome to my April 2023 Great and Powerful Blogging from A to Z Challenge!
I’ve revealed my theme (My life in first drafts), but this year, instead of pretending there were ever plans, I am unashamedly blogging my theme letters on the fly. So, here goes nothing!
 So, without further ado, H is for Hellebores.
I never used to know what Hellebores were. Then one day a work friend of mine asked if I wanted to go to Helleborganza with her and her daughter – their annual trip to SaltSpring Island and Fraser Thimble Farms where they had a great Hellebore sale every year. I said yes and now, many years later, Hellebores bloom happily all over our back and front yards.
If you don’t know what Hellebores are, they are also called Christmas roses (well one variety is called Christmas rose) and they typically start to bloom in December or January and keep blooming for a long time. Mine are all in full bloom now and show no signs of stopping.
Here are some pictures for you.


Thanks for visiting my 2023 A to Z Challenge – Letter H. You can find links to more blogs participating in this challenge at Letter A, A to Z 2023 Challenge Master List (Google Docs).
Guess I’m kind of a rebel too…although I do like using the “official” letters…
